Well, my buddy Ed had some 'rocker bars' added to his '01 Toyota Tacoma
recently:
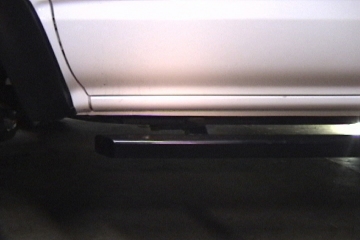
While the bars work (great) and look awesome (better), one thing he didn't
know was that the frame flexes enough to have the body pinch welds along the
bottom of the rocker panels hit the rocker bars (NOT good).
The solution? Well, removing the bars and re-installing them are out of
the question, so, let's lift the body 1".
After calling around, Ed found a 1" body lift with hardware, so Damage
Inc. got a chance to destroy - er - work on Ed's truck.
Ed found this wonderful kit from 4crawler's
web site for only $89.
First, lets look at the hardware provided (hold your mouse over the picture
to see the parts broken down):
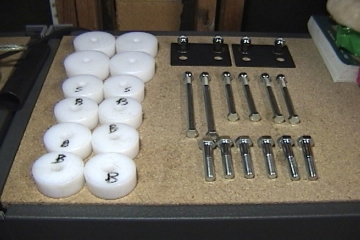
A: Middle and Rear Cab spacers
B: Front Cab spacers
C: Bed spacers
D: Front Bumper cover brackets (to raise the bumper cover with the body)
E: Middle Cab replacement bolts
F: Front and Rear Cab replacement bolts
G: Bed replacement bolts
The tools you'll need are:
5" Vice (to hold bolts and washers for modification)
Dremel tool with cutting bit (to hollow out stock washers for re-use)
Metric Socket set with extensions
Torque ratchet (30ft.lbs. - NO MORE!)
High-lift jack (to raise the body off of the frame)
Scrap lumber [2x4] (to buffer against the jack and the body)
Hammer (to remove the stock washers from the stock bolts)
WD-40 or Penetrating oil (to loosen stock body bolts)
Red Lock-Tite (to secure new body bolts)
Shop Light
A buddy
Patience
Now that we've outlined the tools you'll need, let's show you how we did
it.
THESE PAGES WILL LOAD SLOWLY DUE TO THE AMOUNT OF ILLUSTRATIONS
NEEDED. PLEASE BE PATIENT - THE DETAILED INSTRUCTIONS ARE WORTH THE WAIT!
[ Lift part 1 ] [ Lift part 2 ] [ Lift part 3 ] [ Lift part 4 ] [ Lift part 5 ]
